Our garage is starting to look like Sanford and Son. So much, in fact, that I actually hear this in my head when I walk through the
garage:
Bum bum bah da-Bum bum
bah da da da da,
Bum bum dah da-Bum bum
dah da da da da,
Bum bum bum bum dah da
da da da-da dah!
You know you just started singing it!
And, yes, our garage really looks like that right now-hence my industrious streak!
The reason we could assemble a Les Mis-worthy barricade in our garage is that I have spent many post-employment
hours on Pinterest and have all kinds
of great projects I want to do. Many involve pallets, wood spools and shutters.
Which is perfect, because I keep finding or acquiring pallets, wood spools and
shutters. And wood cabinet doors, and crates, and drawers…aaahhhhhhh!!!!!
That last exasperated cry was the sound of my hubby. At
least in his mind. I decided that out of respect for him and our garage square
footage I would start converting some of this “trash” to treasure.
*Note here. I do not steal this stuff. I ask. It may be by
the curb, behind a business, in a field. I still ask. Every time. I never take
without asking. Never. All someone can do is say no, but if you walked off with
that nightstand by the curb and it was destined for a charity, you just stole
it.
Soapbox (properly obtained) complete.
We are amassing a salvage yard
for several purposes. The first is that I was charged with turning a room in our church into a literal disaster
area for our Confirmation Mission Experience, which emphasized the work of
UMCOR, the United Methodist Committee on Relief.
Our church hosted hundreds of kids from around the North
Texas Conference, and as part of the day they made a trip through our mission
area. The first place they encountered was the “disaster” room, which was
decorated to look like a home that had been through a hurricane or tornado.
To set this space, I had to locate, borrow or acquire
broken, old, beaten, and used items. I lucked out when a nearby house was being
gutted to the studs. They had just torn out the whole kitchen and said I could
have tons of drawers, shutters, doors and cabinets. They even let me borrow a
sink they planned to reuse! Bonus!
Adding fabric, plants, photos, books and papers to the mass
of wreckage really helped finish the look. Our great confirmation small group
girls chose the setup of this event for our group’s mission project. The
awesome Communications ladies at church printed a giant mural to hang in the
room as well. Look achieved!
 |
| "Yea, SWAG girls!" |
 |
| "Entry to Mission Experience" |
After the kids passed through the disaster room, they were
able to run relay races, filling relief buckets one item at a time. The groups
then moved to the next room, where they actually stocked relief buckets for use
by UMCOR. Finally, they arrived at the Coup
de Grace: the disaster simulator.
Earlier in the week, I built two 4’ X 8’ plywood platforms
and mounted 10 large casters under each. I put handles on the top for our
“shakers” to use. One platform was put in each of the two simulator rooms,
which have projection screens.
We placed a long table on either side of each platform and
stacked towers of boxes on the tables. We hung a black curtain in the doorway
and the lights were dimmed. The kids (5th-7th graders)
filed into the rooms about six at a time. They climbed on the platforms and
waited. Guys under the tables were ready to grab the platforms, and other folks
(shout out to the masterful Amy!) manned leaf blowers and water spray bottles.
At the right time, videos started on the big screens of
howling hurricanes and thunderstorms, the leaf blowers started blowing boxes on
the startled kids, and the platforms shook. Water was sprayed on them as boxes
rained down and the lightning flashed. It was pretty awesome.
After leaving the simulators, the kids went to a debriefing
session with an UMCOR representative.
All in all, it was a successful experience. The kids seemed
to get into it and learn more about the UMCOR process. And never underestimate
how fabulous it is to shake, spray water, and blow boxes onto a bunch of
tweens. Cathartic, I must say!
After the cleanup, I found myself with about 12 drawers of
varying sizes, six shutters, eight cabinet doors and a whole slew of Pinterest ideas. I have been cruising
through the projects in the last couple of weeks. Below are some pics of what
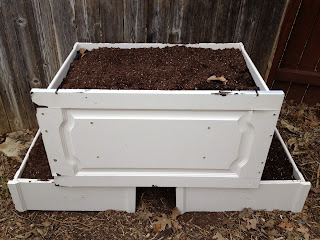
we’ve made. I have spent $10 on clear polyurethane and $15 on soil in total for all of these projects. The rest was using up what I have around. I will go into detail on each one coming up in parts 2, 3 and 4 of the "Trash to Treasure" series here. Oooohhh, I have a series! For now just a teaser!
 |
| "Large sign for, where else? Over the front door!" |
 |
| "Cabinet to hang on girls' bathroom wall for hair accessories." |
 |
| "Raised garden box to expand our garden-making several of these." |


No comments:
Post a Comment